A vending setup works when three things match: the spot, the products, and the service plan. If one is off, you get stockouts, payment issues, and low use.
If I were checking a site today, I’d focus on these points first:
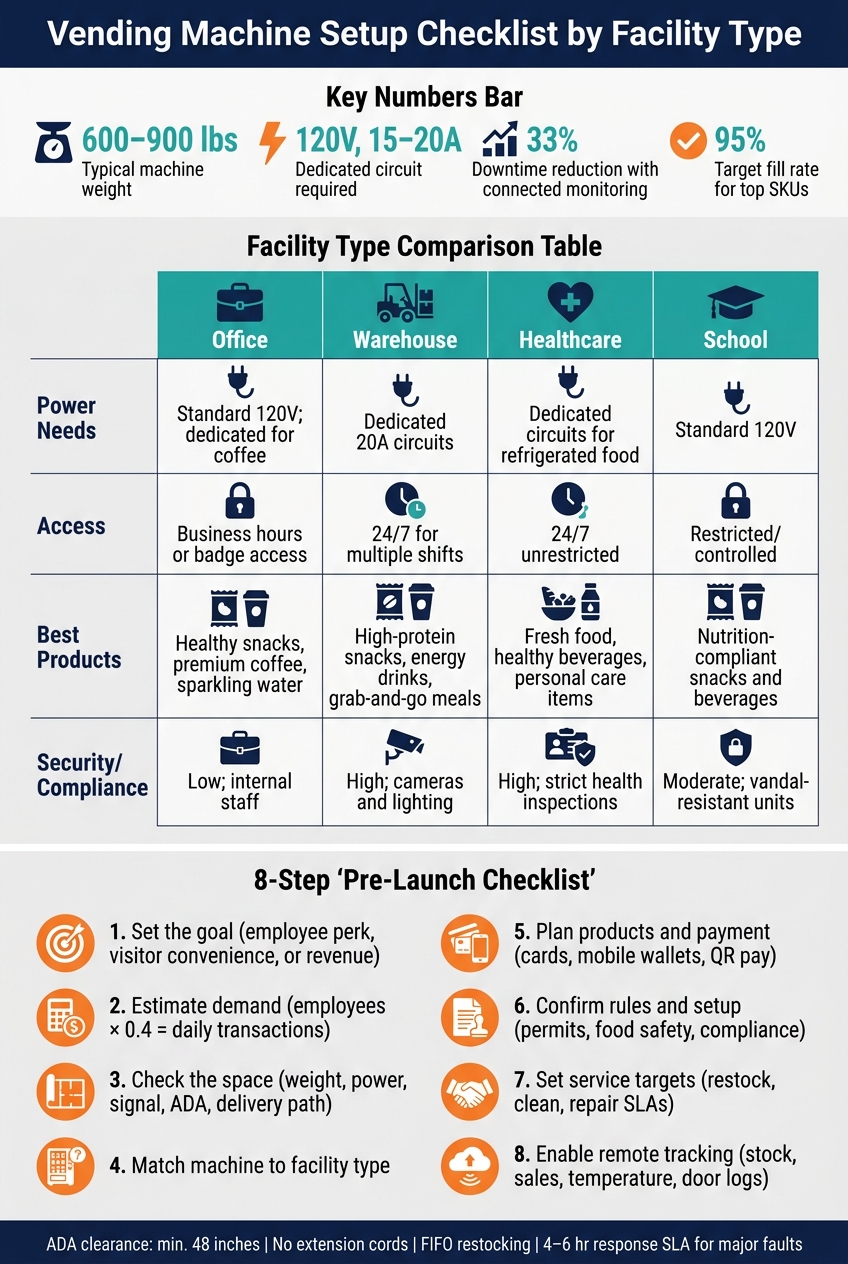
- Set the goal: employee perk, visitor convenience, or site revenue
- Estimate demand: start with employee count × 0.4 daily transactions
- Check the space: machine weight, 120V 15–20A power, signal strength, ADA space, and delivery path
- Match the machine to the site: office, warehouse, healthcare, school, or apartment use all need different setups
- Plan products and payment: stock what people will buy and make sure cards, mobile wallets, and QR pay work on day one
- Confirm rules and setup: placement approval, food safety, temperature checks, and state packaging rules
- Set service targets: restocking, cleaning, repair times, fill rate, and machine uptime
- Use remote tracking: watch stock, sales, temperature, door logs, and payment errors in real time
A few numbers matter right away. Standard machines often weigh 600–900 lbs. They usually need a dedicated grounded circuit. Connected tracking can cut downtime by about 33%. And a solid target is a 95% fill rate on top items.
Vending Machine Setup Checklist by Facility Type
Inventory Management for Vending Machines
sbb-itb-aa27f9f
Quick Comparison
| Check Area | What I’d Confirm |
|---|---|
| Site fit | Foot traffic, clearance, floor load, service access |
| Utilities | Dedicated power, no extension cords, Wi-Fi or cellular at the exact spot |
| Access | ADA space, no blocked exits, restocking access, after-hours entry |
| Product plan | Staff demand, healthy vs. high-energy items, refrigerated needs |
| Payment | Cashless support from launch |
| Compliance | Placement agreement, food safety rules, calorie posting if required |
| Service | Restock frequency, cleaning schedule, repair SLA, escalation path |
| Monitoring | Low-stock alerts, sales data, temperature, door-open logs |
Bottom line: I’d use this checklist to approve the location, pick the right machine type, set service rules in writing, and track results from day one.
Checklist 1: Assess the Location and Machine Fit
Location has a huge impact on vending sales [7]. So before you sign off on a spot, walk the site with a tape measure. You want to check three things: customer access, machine fit, and service access.
Site Placement Checklist
Put machines where people naturally stop for a minute, like break rooms, elevator banks, and lobbies [4]. A machine hidden in a back hallway will usually get used a lot less [4].
Before you lock in the location, confirm each of these details:
- Floor load capacity: Standard machines usually weigh 600 to 900 lbs [3]. Make sure the floor can support that weight.
- Rear clearance: Leave at least 3 inches between the machine and the wall so it can vent properly [4].
- Power supply: Most standard U.S. machines need a dedicated 120V, 15–20A grounded circuit [11]. Refrigerated units use more power, so they shouldn’t share a circuit with heavy equipment like microwaves [1][4].
- Connectivity: Test the Wi-Fi or cellular signal at the exact spot where the machine will sit, not just somewhere nearby [9].
- ADA clearance: Leave at least 48 inches of clear floor space for wheelchair access [3]. Don’t block fire exits, alarm panels, or exit paths [11].
- Delivery route: Measure every doorway, hallway turn, and elevator cab from the loading dock to the final location [11]. A crated machine can weigh 700+ lbs [11].
- Technician access: Check that the machine door can open all the way for restocking without blocking foot traffic [9]. Also confirm whether the site allows 24/7 access or only business-hour access, because that can affect revenue in a big way [7].
- Environmental hazards: Keep machines out of direct afternoon sun, away from HVAC vents, and clear of high-vibration areas or spots with heavy industrial dust [1][11].
Match the Machine to the Facility Type
The right machine depends on the facility. A simple way to estimate daily demand is:
number of employees × 0.4
Use that number to judge whether a standard machine can handle the site [3].
Here’s a quick way to match machine needs to the facility:
| Facility Type | Key Checks | Best-Fit Products |
|---|---|---|
| Office | High visibility near break rooms; ADA clearance; low-noise operation; cashless and mobile pay [1][3] | Healthy snacks, premium coffee, salads, and sparkling water [3] |
| Warehouse | Near shift gathering areas; durable machine casing; 24/7 access for night shifts [1][7] | High-protein snacks, energy drinks, and filling grab-and-go meals [7] |
| Healthcare | Strict sanitation compliance; 24/7 availability for staff and visitors; essential items [1][12] | Fresh food, healthy beverages, and essential personal care items [3] |
If the site runs across multiple shifts, treat 24/7 access as a must-have.
Once the site and machine fit make sense, the next step is to review products, installation, and compliance.
Checklist 2: Plan Products, Installation, and Compliance
With the site approved, it’s time to shift from fit to launch details. After approval, lock in the product mix, machine setup, and everything needed to go live.
Product Mix and Payment Checklist
Start with a quick staff pulse before you stock the machine. Ask about snack preferences, protein-heavy items, and healthier picks. That small step can save you from loading products that just sit there.
Offices often perform best with healthy snacks, premium drinks, and barista-quality coffee. Warehouses, on the other hand, usually need high-energy snacks and drinks that can keep pace with long shifts [5][6].
Machine format matters too. For teams with fewer than 50 people, combo units usually make the most sense. For larger or busier sites, separate snack and beverage machines are a better match [5]. If fresh food is part of the plan, go with a refrigerated unit or an AI-powered smart cooler [5][12].
Payment is simple: cashless support is a must. That means cards, mobile wallets, and QR codes should all work from day one [5].
If you run 20 or more vending machines, you also need to display calorie counts for all food items [12].
Install, Approval, and Compliance Checklist
Once you’ve picked the machine and menu, turn that into a signed install plan. Before go-live, check each of these items.
Permissions and agreements. Get a signed placement agreement from the property owner or manager before ordering equipment. The agreement should spell out utility duties, access hours, and revenue terms [11][4].
Electrical and network setup. Confirm that a dedicated 120V, 15–20A grounded circuit is available within 6 feet of the machine location. Don’t use extension cords [11][4]. For smart machines or refrigerated units, make sure the circuit isn’t shared with heavy equipment. Also test Wi-Fi or cellular signal at the exact placement spot so cashless payments, remote monitoring, and inventory tracking work as expected [2][4].
Sanitation and food safety. If you plan to stock refrigerated items, verify temperature monitoring and any health department rules that apply [1][11]. Also check whether your state has PFAS packaging bans in place. As of 2026, states including Oregon, Colorado, and Maryland restrict PFAS chemicals in food packaging, which can affect what you can stock [12].
Use this matrix to sort your go-live checks:
| Facility Type | Power Needs | Access Requirements | Sanitation/Compliance | Security Needs |
|---|---|---|---|---|
| Office | Standard 120V; dedicated for coffee | Business hours or badge access | Low dust; climate controlled | Low; internal staff only |
| Warehouse | Dedicated 20A circuits for heavy use | 24/7 for multiple shifts | High dust/vibration; needs airflow | High; cameras and lighting [1] |
| Healthcare | Dedicated circuits for refrigerated food | 24/7 unrestricted access | High; strict health inspections [12] | High; badge-controlled zones |
| Schools | Standard 120V | Restricted/controlled access | High; nutrition compliance [12] | Moderate; vandal-resistant units |
Wrap this stage with a final pre-launch test. Before go-live, run a commissioning check for placement, utilities, SKU load, user roles, and one test vend [2].
Checklist 3: Set Service, Restocking, and Monitoring Standards
Once the machine is installed and approved, the work shifts to day-to-day upkeep. That means keeping it stocked, clean, and online. A solid service plan helps the machine stay dependable after launch.
Restocking and Cleaning Schedule
How often you restock depends on foot traffic and what the machine sells. Snacks move at a different pace than drinks, and busy break rooms burn through both fast. This table shows the main tasks and how often they should happen:
| Task | Frequency | What to Do |
|---|---|---|
| Visual Inspection | Daily | Check for error codes, payment terminal status, and obvious spills |
| Surface Cleaning | Weekly | Wipe down touchscreens and glass, clean the delivery bin, sweep under the unit |
| Restocking | 1–3 times per week | Refill based on alerts; rotate stock using first in, first out (FIFO) to prevent expirations [14] |
| Monthly Maintenance | Monthly | Remove trays for cleaning, lubricate product pusher tracks with food-grade silicone, check refrigeration coils; review sales trends, stockout reports, and vendor response times [5][14] |
One simple step gets missed all the time: add a contact sticker to every machine with a direct email address or phone number. That way, employees can report jams or payment issues right away [4].
Don’t treat the schedule as fixed. Use monitoring data to adjust it before stockouts start.
Inventory Tracking and AI Monitoring Checklist
AI-enabled telemetry tracks item-level stock, sales by payment type, temperature status, door events, and errors in real time [13]. Connected monitoring can cut machine downtime by about 33% [13].
A well-set monitoring setup should include:
- Low-stock alerts that trigger before items sell out [5]
- Demand forecasting and predictive restocking based on past sales, so refill amounts match actual need, reduce wasted service trips, and flag weak products for replacement [13]
- Early warning signals for repeat payment failures or odd sales drops before they turn into bigger issues [13]
- Service verification through door-open logs that show whether a restocking visit actually happened [13]
Those logs matter. If service slips, they give you proof.
Vendor Service Expectations and Accountability
Before go-live, confirm in writing who handles installation, equipment, restocking frequency, preventive maintenance, and repairs [1][6].
Response time isn’t something to leave vague. Managed programs should aim for same-day or next-day fixes for reported jams or payment failures [8]. You’ll also want a clear escalation path. Start with the route driver, then move the issue to a dedicated account manager or service line if it isn’t fixed [8][4].
Managed service can package equipment, installation, maintenance, and restocking at $0 upfront, but the facility still needs to check service through logs and monthly reports.
Conclusion: Use the Checklist to Pick a Vending Setup That Fits Your Facility
Once you’ve checked the site, product plan, and service terms, do one last pass to pick the setup that fits best. Start with the basics: location fit, product mix, and utility needs[1][4][7][10].
Before delivery, make sure ADA clearance, electrical setup, and permits are all confirmed[1][4][12].
Set clear SLA targets for restocking, cleaning, and maintenance. A good baseline is a 95% fill rate for top SKUs and a 4–6 hour response window for major faults. If you’re using a managed or AI-powered setup, rely on telemetry to check fill rate, downtime, and response speed[5][15].
When the checklist is done, compare vendors against the same standards. Write down each checkpoint and hold the vendor to the SLA.
FAQs
How do I choose the right machine size for my site?
Choose the right machine size by matching your available floor space with daily user traffic. Start with the basics: measure the machine’s footprint, ceiling height limits, and door-swing clearance. Also leave about 3 inches behind the unit so it can ventilate properly.
Here’s a simple way to think about it:
- Compact or countertop units work well for sites with fewer than 30 to 75 people
- Standard combo machines fit locations serving 75 to 150 users
- High-capacity or dual-door machines are a better fit for 150 to 300+ employees
It’s a bit like picking the right parking spot for a truck. If the space is too tight, daily use turns into a hassle fast. If the machine is too small for the crowd, it’ll feel overloaded almost right away.
When do I need a refrigerated vending machine?
You need a refrigerated vending machine if your product mix includes items that need climate-controlled storage, like fresh food or certain drinks.
Before installation, check that your facility can handle the unit’s higher power draw. Also make sure the location meets local health rules for food storage temperatures and is easy to clean.
What service levels should I require from a vending vendor?
Set clear written service level agreements for restocking, cleaning, maintenance, and repair response times. In many cases, that means service within 48 hours. You should also confirm exactly how the vendor handles out-of-order machines and product outages.
It also helps to ask about:
- How inventory replenishment works
- Whether remote or AI-based monitoring is used
- Performance guarantees for fill rates and uptime
- Whether there are financial penalties if service targets are missed
That last point matters more than it may seem. A service promise sounds good on paper, but if there’s no cost for missing it, the promise may not mean much.